Pay attention, as this skill has the ability to make or ruin your whole cosmetics appearance. Lipstick has been the most ubiquitous cosmetic product for decades, and for a good reason, too. If you know how to apply lipstick properly, you can boost up your appearance instantaneously, give your cosmetics a professional look, and get that dolled-up vibe. No surprise then that women can’t just do without it! A prevalent adage goes: ‘Give a woman the proper rouge, and she can conquer the world.’
However, not everybody knows how to fool around with this miraculous implement. It is an art that needs precision, technique, and practice. And if you are new to the world of cosmetics and lip color, here is all the assistance you need to be initiated. This article outlines some techniques and strategies for those struggling to conquer the art of applying lip color.
So, if your lipstick dissipates rapidly or seeps on the outside of your mouth and onto your teeth, let us help you out with these simple methods to apply lipstick flawlessly. Scroll down!
How To Apply Lipstick Perfectly
To accomplish the perfect pout and to make sure it remains, remember to follow these simple tutorials and techniques for that elegant appearance that lasts all day.
Let’s commence with what we need:
-
A fortifying lip balm/ lip conditioner
-
A lip liner Concealer Compact powder
-
Your fave lipstick
-
And now we dive directly into the tutorial.
Method 1: Regular Step By Step Tutorial To Apply Lipstick
Step 1: Prep Your Lips
This is the first and paramount phase and I can’t emphasize upon this enough – preparing is essential! You don’t want to be wandering around with parched, scaly lips. Exfoliate with a gentle, moist toothbrush and hydrated by applying a fortifying lip balm to make those lips soft, supple and healthy-looking. You may apply a lip primer after to make the pigment remain on longer and to prevent it from leaking. An alternate method to exfoliate is by using a sugar exfoliator.
A blogger revealed her techniques for applying lipstick effectively. She mentioned, “When I have to attend a party at night so I start to apply lip balm from the morning, reapply it many times I feel like to get soft and plump lips at the time of applying makeup (i).”
Step 2: Apply A Base
If you are concerned about any kind of discoloration or an asymmetrical lip tone, it’s vital for your lipstick to have a base to hold onto. This is to make sure your lipstick does not seep into your lips. Choose a concealer hue that suits your lip color and daub a little on it with a flat brush or a small airy brush. Apply some compact over this to solidify the base. It also allows your lip color to remain on longer.
Note: The M.A.C Prep + Prime Base is an excellent option and is also recommended by professional makeup artists.
Step 3: Use A Lip Liner
To define your natural lip line and to prevent your lipstick from getting untidy, use a decent lip liner to define, reshape and perfect the contours of the lips. This way you will obtain a more defined, precise and polished appearance.
Trace over your natural lip line from one corner to another with a liner that suits your skin tone to prevent feathering (this sometimes depends on coordinating it with the lipstick you decide to wear). To make the cupid’s bow more prominent, create a ‘X’ shape on your upper lip, just below the cupid’s bow.
Don’t fret if the lines on the inside are slightly imperfect because the lipstick will conceal them anyway – but it’s the exterior lines that matter.
Note: Use a liner that has a moderately silky texture for simpler application. I really like the Lakme 9 to 5 Lip Liners that come in various gorgeous colors.
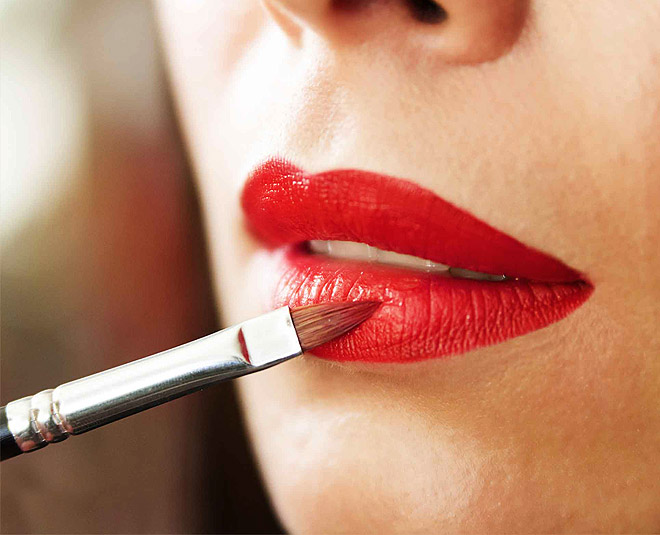
Step 4: Apply the Lipstick
Once you complete all the above steps and choose your lipstick, take some product onto a lip applicator and apply it uniformly all over your lips. Don’t leave out the interior corners. Ensure you apply it within the corners of your etched lips. Go coat by coat and intensify the color as you please. Usually, one decent application of a quality lipstick will suffice.
Note: If you have dry lips, you may not want to use matte lipsticks since they tend to condition your lips even more. Look for emollient cosmetics that also condition your lips.
If your lips are on the slimmer side, avoid using very dark colors as they tend to make your lips appear smaller.
The blogger also added, “I always run my index finger after applying liquid lipstick to get the extra product off my lips. For some liquid lipstick which are viscous like Sugar Smudge me not liquid lipsticks I prefer to use a small brush ,it helps to distribute the substance evenly.”
Step 5: Add Definition
Use a small concealer powder and work on your margins to rectify the contour of your lips. This is optional but if you want to give your lips that pouty appearance, you can apply a subtle trace of lip gloss.
Now that you’ve got a fundamental idea of priming your lips and applying lipstick flawlessly, let’s cover a few other essential ideas that you can make use of.
Read Also: How To Do Baby Face Makeup?
Method 2: How To Apply Lipstick Without Lip Liner
In case you don’t have a lip liner in your cosmetics compact, don’t despair because there exists a secret to applying lipstick precisely, without using a liner.
Step 1: Use Your Finger
Rub your ring finger into the lip color of your choice and apply this finger directly onto your lips moving along the natural lip line. This method you accomplish precision without a liner.
Step 2: Finish The Look
For the interiors of your lips, finish off by applying the color either directly from your lipstick tube or using a lip applicator.
Wasn’t that simple? This tactic also comes convenient when you are in a hurry!
Let’s look at some other basic techniques to help you accomplish lipstick that is so on point.
Method 3: How To Apply Lipstick on Dark Lips
If you have dark, pigmented or discolored lips, with a few basic techniques, you can still conquer your lip color. Do not stray away from light colors or transparent pinks because these tactics do work if you just put in some effort.
Step 1: Conceal
The key here is to neutralize pigmented lips using a concealer that precisely matches your skin tone. Where there’s darkness, there’s always concealer, so it’s not strange to use one for your lips. You will be astonished at the difference it makes.
Step 2: Add Some Extra Coverage
If a little concealer wasn’t of much help, you can dot a little more of the product onto your lips till you accomplish your desired effect.
Step 3: Line Your Lip
Use a lip liner that matches with the lipstick color and meticulously line your natural lip line creating a cross or a ‘X’ directly under the cupid’s bow to accentuate the contour of your lips.
Step 4: Layer The Lipstick On
Apply your lipstick in layers if required. Use a non-glossy formula for improved results. Also, those have a much greater staying power than viscous or lustrous lipsticks.
How Long Should You Keep A Lipstick?
Different lipstick brands and formulations may have different expiry dates. Do verify those details on the product and use them accordingly. In general, cream-based lipstick formulations are excellent for one to two years, while lip cosmetics may deteriorate within six months to a year. Avoid using cosmetics that are expired or are beyond their “best before” date. Not only will they lose their color and texture, but they will also increase the risk of bacterial infections, rashes around the lips, or exacerbate parched lips.
How To Remove Lipstick?
There are several methods to remove lipstick. Ideally, you can use a makeup remover that you will find in profusion in the market. I particularly prefer Neutrogena’s Eye and Lip makeup remover as it does the job effectively, yet delicately and Neutrogena’s products are very reliable.
We must be delicate with our lips, and while removing lipstick, we must always ensure that we don’t injure or dry out our pucker in the process.