Okay so you have hooded eyes. You know the drama. You put on that pretty eyeshadow. You blend it nicely. You feel good. Then you open your eyes and poof. It is gone. Like it never happened. Or eyeliner. Ugh. You try to do a wing. You make it perfect. You look up and it is swallowed by your skin. Just folded into nowhere.
I have been there. It is so annoying. But here is the thing. Your eyes are not the problem. The problem is that most makeup advice is for people with lots of lid space. You do not have that. So you need different rules. I learned these tricks the hard way. Through trial and error. Lots of errors honestly. But now I know what works. And I want to share that with you. This guide is for total beginners. No fancy words. No confusing steps. Just real stuff that actually helps.
How To Know If You Have Hooded Eyes?
- First let us make sure you actually have makeup hacks for hooded eyes beginners.
- Stand in front of a mirror. Look straight ahead. Do not raise your eyebrows. Just relax your face.
- Can you see your eyelid? Like the part where you put eyeshadow?
- If you see a big chunk of lid, you probably do not have hooded eyes.
- But if you see mostly skin from your brow bone hanging down over your lid, then yes. You have hooded eyes.
- Another test. Close one eye. Feel your lid. Now open it slowly. See how much of that lid gets covered? That is the hood.
- Some people have it from birth. Others get it as they age. Skin loses firmness over time. It happens to all of us.
- Either way, the result is the same. Your makeup hides when you open your eyes. So we fix that.
Read Also: How To Apply Foundation With Fingers For Beginners
Prep Work Matters A Lot
- I used to skip primer. I thought it was a waste of time. I was wrong.
- Your eyelids move constantly. You blink. You raise your brows. You squint. All that movement makes eyeshadow crease.
- Plus your lids produce oil. It is just what they do. That oil breaks down your makeup.
- So step one is primer.
- Take a tiny bit. Like half a grain of rice. Dab it on your lid. Spread it up to your brow bone.
- Wait for it to dry. It takes maybe thirty seconds.
- Then take some translucent powder. Just a little. Put it on a fluffy brush. Tap off the extra. Sweep it over your lid.
- I know this sounds extra. But trust me. This step saves everything. Your shadow stays put. It does not move into your crease. It actually shows up.
Where To Put Eyeshadow?
- This is the biggest thing. Location matters more than color.
- Most tutorials say put dark shadow in your crease. That is for other eye shapes. For you, that does nothing.
- When you open your eyes, your natural crease is covered. So that dark shadow? It disappears. Completely hidden.
- Instead you need to create a fake crease.
- Take your darker shadow. Put it above your natural crease. Like higher up. Almost towards your brow bone.
- When you open your eyes, that color stays visible. It tricks the eye into thinking you have more lid space.
- I know it feels weird at first. You will think you are putting shadow too high. You are not. You are putting it where it can actually be seen.
- Now here is the most important trick.
- Keep your eyes open when you apply shadow. Look straight into the mirror. Do not close your eye. Do not look down.
- If you close your eye, you will put shadow in the wrong place. You will blend it into the hood and it will get lost.
- Look straight ahead. That way you see exactly where the shadow needs to go.
Blending Technique
- Blending is not hard. You just need to go in one direction.
- Start at the outer corner of your eye. That is the part closest to your ear.
- Take your brush and blend upwards and outwards. Like towards the end of your eyebrow.
- Do not blend straight across your eye. That drags the color down. Go up instead.
- This upward motion lifts your eye. It creates a nice shape. It makes your eyes look more open.
- I also like to keep the darker color mostly on the outer half of my eye. The inner half gets lighter shades.
- This simple trick opens up your eyes a lot.
Eyeliner Is Tricky But Doable
Eyeliner. The thing we all struggle with.
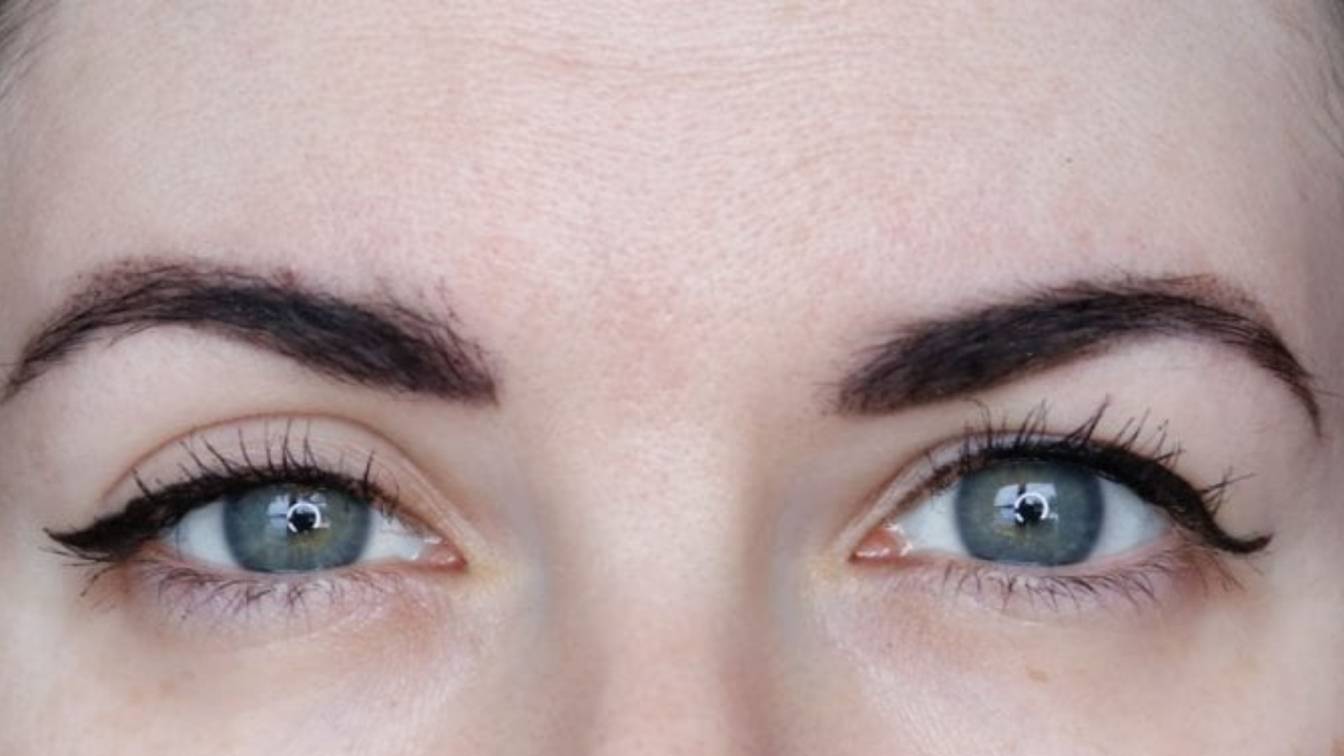
Here is the first rule. Keep it thin.
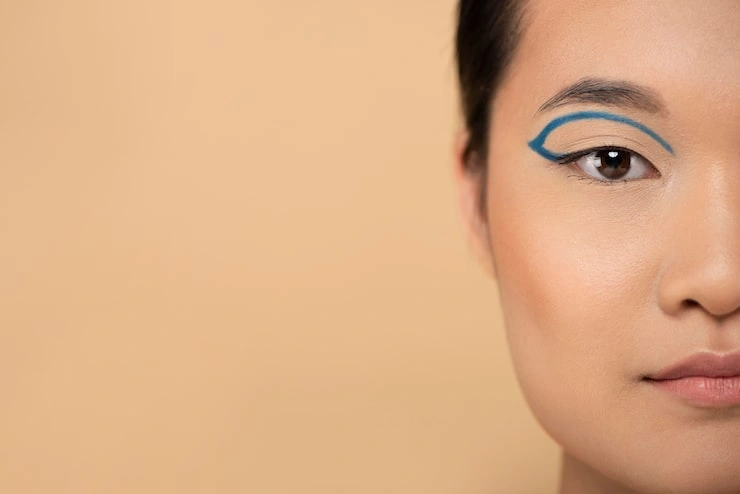
Thick eyeliner takes up all your visible lid space. You worked hard to put on eyeshadow. Do not cover it up with a giant black line. Keep the line as close to your lashes as possible. Tight and neat. That is all you need. Now wings. Yes you can do a wing. But not the usual way. The classic winged liner goes straight out or slightly down. That does not work for you. It gets eaten by the hood. Instead you need to start your wing from a different spot. Keep your eyes open. Look straight into the mirror. Start at the outer corner of your eye. Draw a line upwards. Like towards the end of your eyebrow. Make it a straight line. Not curved.
This is your wing. It goes up, not sideways. Now from the tip of that line, draw a line back to your lash line. Connect it. Fill in that triangle shape. Then take your liner and draw a thin line from your inner corner to the middle of your eye. Stop there. Do not take it all the way across unless you want a very thin line. This winged style works because it points up. It does not get hidden by your hood.
Tightlining
This is a game changer.
- Tightlining means putting eyeliner on your upper waterline. That is the skin right where your lashes grow.
- Take a pencil liner. Gently lift your upper lid. Tuck the liner into the base of your lashes. Wiggle it in there.
- This makes your lashes look thicker. It defines your eye shape. But it takes up zero lid space.
- It is such a simple thing. But it makes your eyes look bigger and more awake.
Mascara Rules
Mascara is your friend. But you have to use it right. First thing. Curl your lashes. Every time. Take your lash curler. Clamp it at the base of your lashes. Hold for five seconds. Move it to the middle. Clamp again. This gives a nice natural curl. Do not skip this. Curled lashes lift the hood slightly. It gives you a bit more lid space. Every little bit helps. Now mascara formula. Avoid heavy thick mascaras. They weigh your lashes down. Droopy lashes make your eyes look tired. Go for lengthening mascara. It separates your lashes and lifts them.
Tubing mascara is really good for makeup hacks for hooded eyes beginners. It coats each lash individually. It does not smudge or flake. Because your lids rub against your lashes sometimes. Regular mascara transfers onto your skin. Tubing mascara stays put. When you apply, focus on the outer lashes. Put more product there. This widens your eyes.
Highlighting
A little highlight goes a long way.
- Take a light shimmer shadow. Put it in the inner corner of your eye. Right next to your nose.
- This brightens your whole eye area. It makes you look fresh and awake. It is such a small step but it changes everything.
- You can also put a matte light shade under your brow bone. Just below your eyebrow. This lifts your eye upward.
- Do not put too much shimmer directly on your lid. It gets lost in the hood. And it can make the hood look more prominent.
- Save shimmer for the inner corner and the center of your lid if you want. But keep it minimal.
Read: Best Color Blush for Olive Skin Tones
Mistakes To Avoid
- I made all of these mistakes. Learn from me.
- Thick eyeliner across your whole lid. Bad idea. It eats up your lid space. Your eyes look smaller.
- Putting dark shadow in your natural crease. Wastes your time. It will not show.
- Using heavy false lashes. They weigh down your eyes. Choose light wispy lashes if you wear them.
- Skipping primer. Your makeup will crease within an hour.
- Applying makeup with your eyes closed. You will put everything in the wrong spot. Keep your eyes open.
What Products To Buy?
- You do not need expensive stuff. Just the right stuff.
- Primer. Any brand works. Just use it.
- Eyeliner. Liquid liner with a fine tip gives you control. Waterproof helps it stay.
- Mascara. Try tubing mascara. It is worth it.
- Eyeshadow. Matte and satin finishes are easiest. Shimmer is fun but can crease more.
- Lash curler. Get a good one. It makes a difference.
Practice Makes Better
Do not expect perfection on your first try. I messed up so many times. My wings were crooked. My shadow was too low. My mascara smudged. That is fine. You learn by doing. Pick one trick and practice it. Maybe just work on the eyeshadow placement. Do that for a week. Then add the eyeliner trick.
Small steps add up.
You Got This
Hooded eyes are beautiful. They have depth and mystery. You just need to know how to work with them. These hacks are simple. But they change everything. Your eyeshadow stays visible. Your eyeliner actually shows. Your eyes look more open. Try them out. See what works for you. And remember. Keep your eyes open when you apply. That is the most important rule.